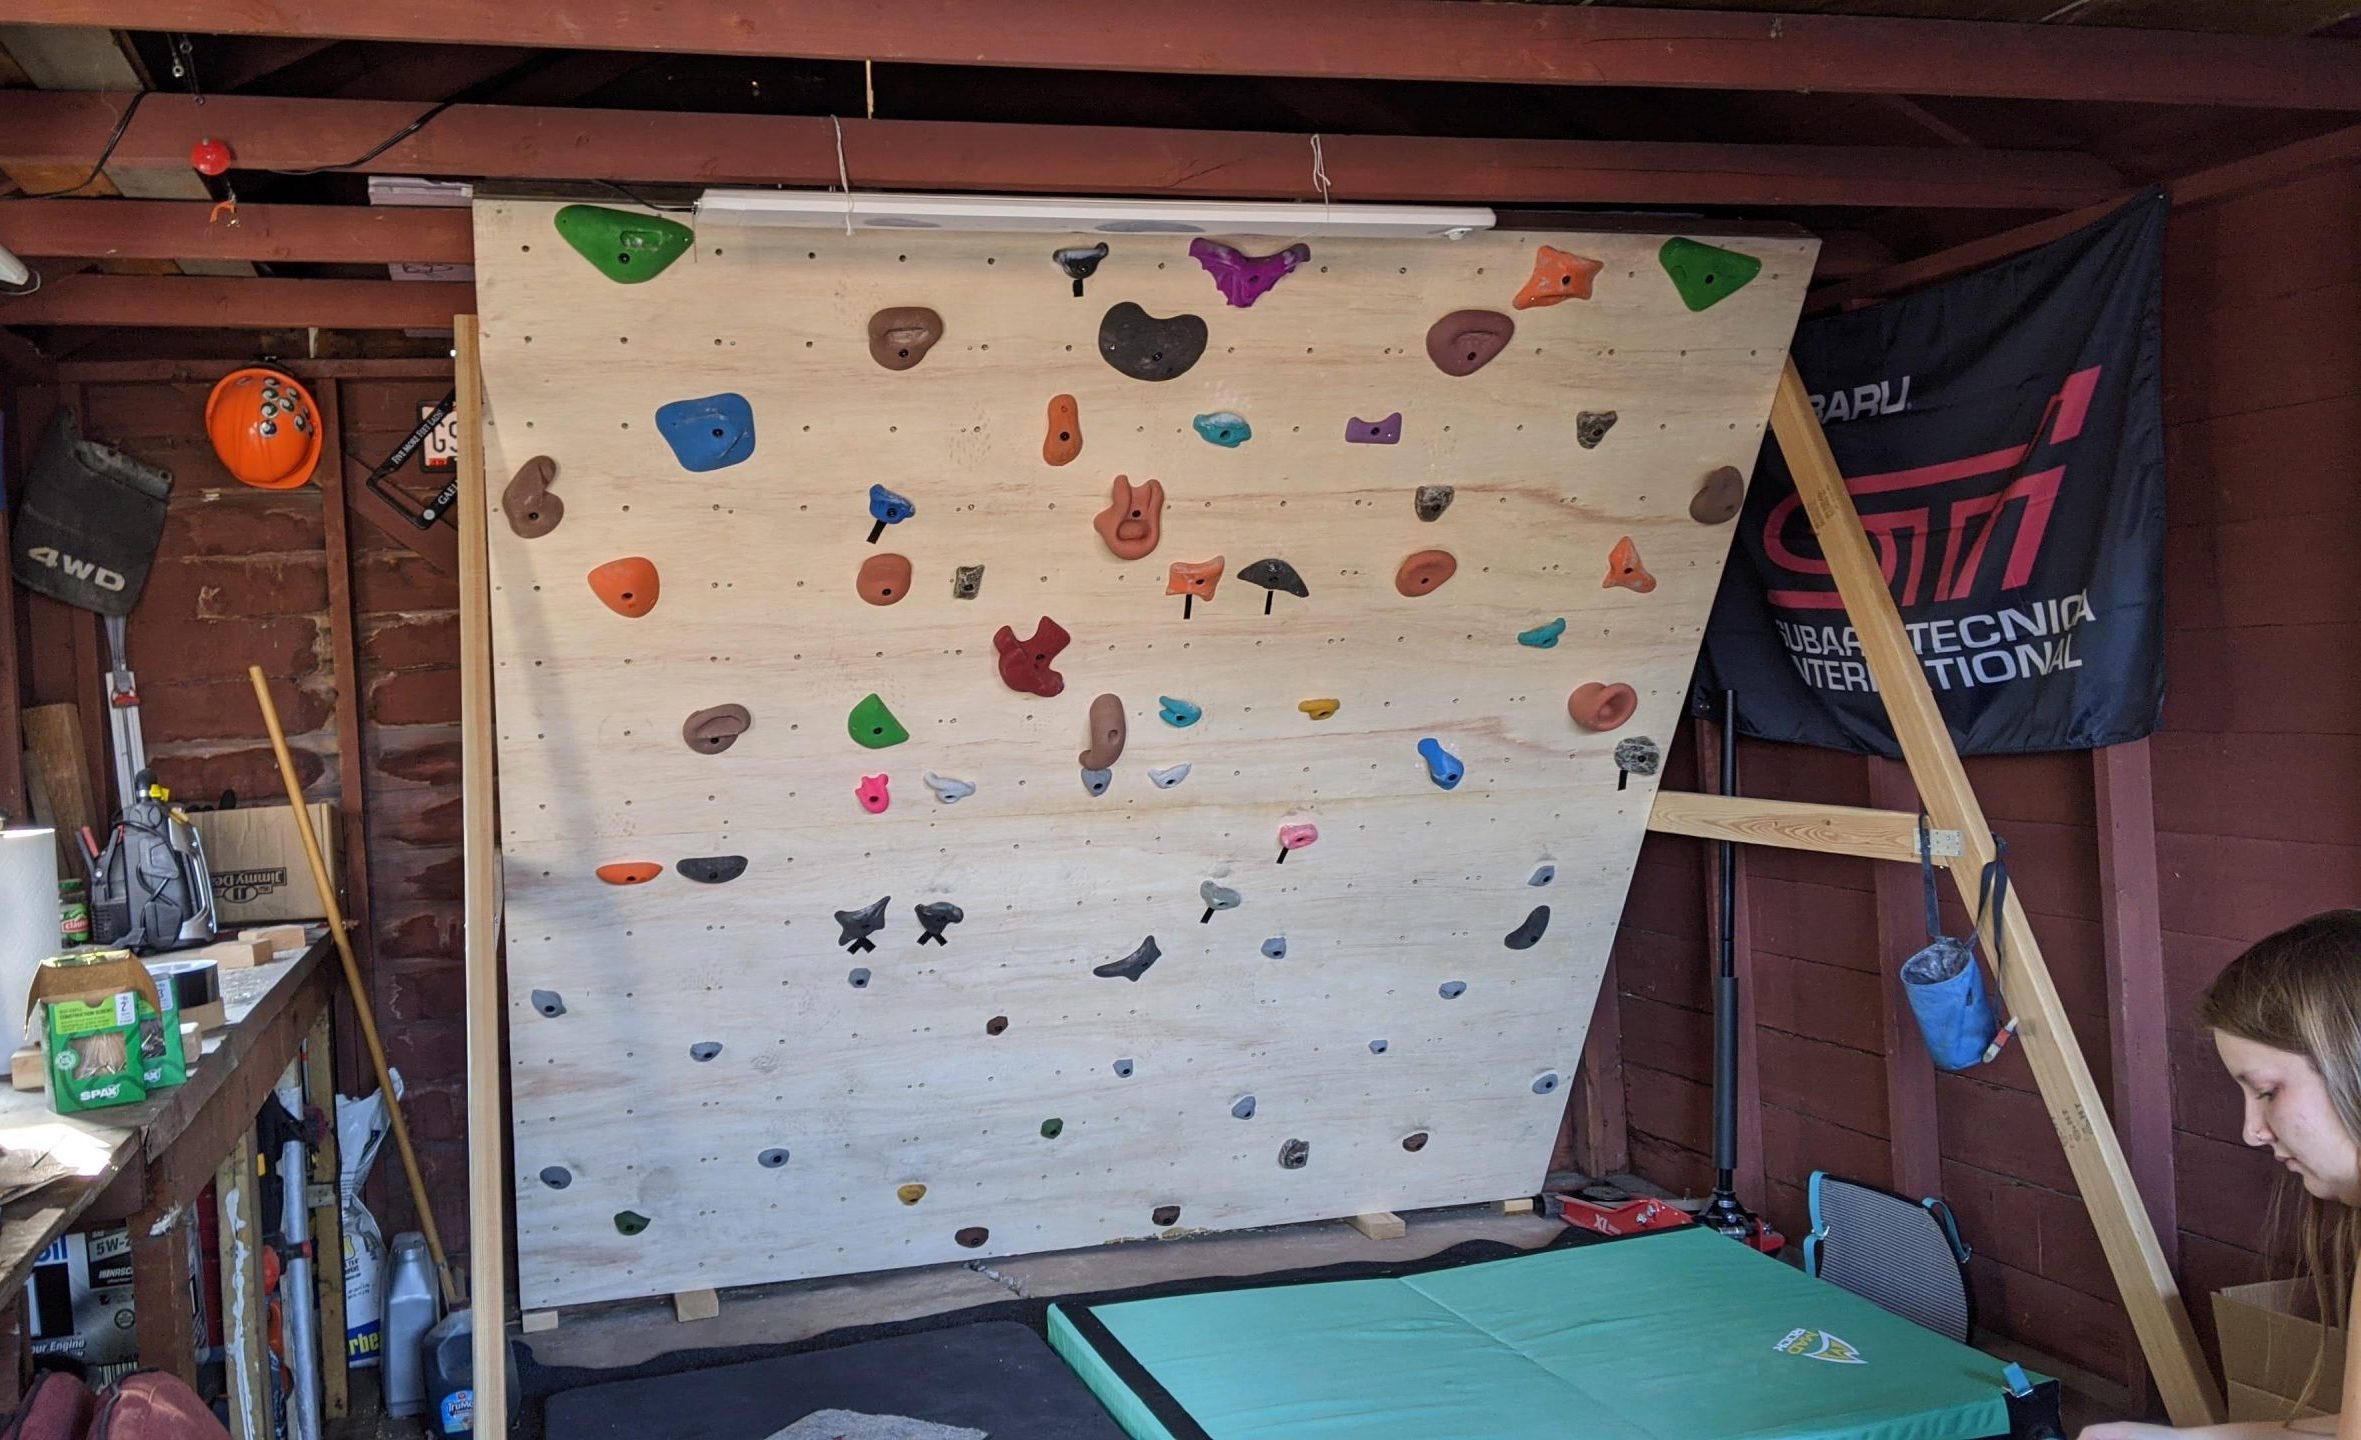
How to Build a Freestanding Home Climbing Wall
A home climbing wall is a great way to stay in shape and have fun at the same time. Building a freestanding home climbing wall is a relatively easy project that can be completed in a weekend. Here are the steps you need to take to build your own freestanding home climbing wall:
1. Choose the location for your climbing wall. An unfinished basement or garage is a great spot for your wall. If you don’t have an unfinished space, any room with high ceilings will work. Just make sure there’s enough clearance around the perimeter of the room so you can safely climb without hitting anything.
2. Gather the materials you’ll need to build your wall. You’ll need plywood, 2x4s, screws, washers, drywall screws, and T-nuts. You can find most of these items at your local hardware store.
3. Cut the plywood into 4’x8′ sheets using a circular saw or table saw. Make sure all of the cuts are straight so your panels will fit together nicely when it’s time to assemble them.
- Decide on the dimensions of your wall
- It is important to consider the height, width, and depth of your wall when deciding on its dimensions
- The height should be tall enough for you to comfortably climb, while the width and depth will impact the stability of the wall
- Choose a location for your wall
- Once you have decided on the dimensions of your wall, you need to choose a location for it
- The location should be level and firm, with enough space around it so that you can safely climb without hitting anything nearby
- Gather materials
- You will need lumber for the frame of your wall, plywood or OSB for the face of the wall, screws or nails, and climbing holds
- Climbing holds come in a variety of shapes and sizes; choose ones that are appropriate for your skill level and desired difficulty of route-setting
- Build the frame of your wall
- Cut lumber to size and assemble it into a rectangular frame using screws or nails; make sure that the frame is square and level before attaching the plywood or OSB face sheets
- Face sheets should be attached securely so that they cannot shift or move during use
- Install climbing holds
- Drill pilot holes into the face sheets at evenly spaced intervals, then screw or bolt climbing holds into place using washers to prevent them from pulling through the wood over time
- Start with easy-to-moderate routes and add more difficult ones as you become more comfortable with setting climbs
Home Climbing Wall Kit
A home climbing wall kit is a great way to get into rock climbing without having to leave the comfort of your own home. Kits generally come with everything you need to set up a small-scale indoor or outdoor climbing wall, including holds, mats, and sometimes even an instructional DVD. One of the great things about kits is that they offer an easy and relatively inexpensive way to start climbing.
They also make it possible to set up a climbing wall almost anywhere – in your garage, basement, shed, or even your living room! If you’re short on space, there are even kits designed for smaller areas like closets or under staircases. If you’re interested in purchasing a kit, there are a few things to keep in mind.
First, decide whether you want an indoor or outdoor wall. Outdoor walls will require more sturdy construction and weatherproofing but will be able to withstand more wear and tear than indoor walls. Second, consider the size of the wall – most kits come in 4′ x 8′ or 5′ x 10′ panels, but larger sizes are available as well.
Finally, take a look at the different hold options and choose what best suits your needs and interests. With so many different home climbing wall kits on the market today, there’s no excuse not to start rock climbing!

Credit: www.pinterest.com
How Do You Make a Homemade Climbing Wall?
Assuming you would like tips on how to create a DIY climbing wall, here are some helpful pointers. Keep in mind that the specifics will vary depending on the size and shape of your wall, as well as your budget.
Choose the right location
The first step is to find a suitable spot for your climbing wall. It should be close to where you train so you can easily use it during your workouts. If possible, pick a location with good sunlight exposure since indoor walls can get quite hot during the summer months. Also, make sure there is enough space around the wall so you can move freely while climbing.
Decide on the type of wall
There are two main types of climbing walls – freestanding and attached. Freestanding walls are more versatile since they can be placed anywhere and don’t require any special installation, but they are also more expensive. Attached walls are cheaper and easier to build, but they need to be secured to a solid structure like a concrete wall or a wooden beam/studs in your home’s framing.
Collect the materials you need
Once you’ve decided on the type of wall and found an appropriate location, it’s time to gather all the necessary materials. For an attached wall, you will need plywood sheets ( at least 3/4 inch thick), 2×4 lumber, screws, washers, bolts, a drill, saw hammer, level, and tape measure.
If you’re building a freestanding wall, in addition to the above list, you will also need 4×4 posts (8 feet long), post brackets, and concrete mix.
What Angle Should a Home Climbing Wall Be?
The angle of a home climbing wall should be determined by the type of rock climbing you want to do. For instance, if you want to bouldering, which is a form of rock climbing that uses shorter routes without ropes or harnesses, then you’ll need a steeper wall with more holds. A 45-degree angle is often used for bouldering walls.
If you’re interested in lead climbing or top roping, which are both forms of rope-assisted rock climbing, then you’ll need a less steep wall with fewer holds. A 30 to 35-degree angle is often used for lead and top rope walls.
How Thick Should Plywood Be for Climbing Wall?
When it comes to climbing walls, the thickness of the plywood is very important. The thicker the plywood, the more stable the wall will be. However, if the plywood is too thick, it will be very difficult to drive nails into it.
For this reason, most people use 3/4-inch plywood for their climbing walls.
What Kind of Wood Should I Use for an Outdoor Climbing Wall?
There are a few things to consider when choosing wood for an outdoor climbing wall. The first is the climate. If you live in an area with harsh winters, you’ll want to choose a wood that is resistant to rot and decay, such as cedar or redwood.
If you live in a more moderate climate, you have more options. Some popular choices for outdoor climbing walls include plywood, pressure-treated lumber, and Douglas fir. The next thing to consider is the size of the climbing wall.
If you’re building a small wall for children to climb on, lighter-weight woods like pine or poplar will be fine. For larger walls or those intended for adult use, you’ll need something stronger like oak or maple. Finally, think about how the wood will be finished.
For a natural look, leave it unfinished or stain it with a clear sealer. For a more colorful look, paint it with exterior latex paint specifically made for use on wooden surfaces. Just make sure whatever finish you choose can withstand exposure to sunlight and moisture without peeling or fading.
Conclusion
In order to build a freestanding home climbing wall, one must first gather the necessary materials. These include plywood, 2x4s, screws, washers, and bolts. Once all of the materials have been collected, the next step is to cut the plywood into four equal pieces.
Two of these pieces will be used for the front and back walls, while the other two will be used for the side walls. After the plywood has been cut, it is time to attach the 2x4s to each piece using screws and washers. Be sure to place the 2x4s evenly so that they create a frame for the climbing wall.
Next, it is time to drill holes into each 2×4 so that bolts can be inserted. It is important to make sure that these holes are large enough for a person’s hand to fit through easily. Finally, once all of the holes have been drilled, it is time to assemble the climbing wall by attaching each piece of plywood to another with bolts.
Once everything has been put together securely, your home climbing wall is complete!