How to Make Digital Screen Print Transfers at Home
Making digital screen print transfers at home is a great way to create unique, personalized gifts and decorations. The process is simple and only requires a few supplies that you likely already have around the house. With a little time and effort, you can turn any image into a screen print transfer that can be applied to nearly any surface.
- Find an image you want to use for your screen print transfer
- The higher the resolution, the better quality your final product will be
- Print out the image onto regular printer paper using a laser printer or photocopier
- Make sure to mirror or flip the image so that it will print in reverse on the transparency film
- Cut out the printed image, leaving a small border around it
- Tape the cut-out onto a sheet of transparency film, making sure that there are no air bubbles between the paper and film
- Use an exacto knife or other sharp object to carefully trace over the lines of your printed image, cutting through both the paper and film
- Be as precise as possible so that your final screen print will have clean lines
- Remove the taped paper from the transparency film and you should now have a negative of your original image cut into the film
- Place your piece of transparency film onto a light box or hold it up to a window so that you can see the negative image through it clearly
- Tape one edge of your screen fabric down on top of the transparency, lining up evenly with one side
- Slowly roll or pull your squeegee across the screen fabric, applying even pressure as you go over each section of your design until all areas are covered with ink/paint/emulsion mixture
- Allow time for ink/paint/emulsion mixture to dry completely before peeling awayscreen fabric from transferred design
What Printer Do I Need to Make Screen Print Transfers
Are you looking for a printer to make screen print transfers? If so, there are a few things you need to keep in mind before making your purchase. Here is what you need to know about finding the right printer for screen print transfers.
The first thing you need to consider is the type of paper that you will be using. Screen print transfers require a very specific type of paper in order to work correctly. You will need to find a printer that is specifically designed for use with this type of paper.
Otherwise, your prints may not come out correctly or they may not adhere to the fabric properly. Another important consideration is the resolution that your printer offers. Screen print transfers require high-resolution printing in order to look their best.
Make sure that your printer can handle high-resolution printing before making your purchase. Otherwise, you may be disappointed with the results. Finally, take into account the cost of ink and other supplies when choosing a printer for screen print transfers.
These supplies can add up quickly, so it’s important to find a printer that doesn’t break the bank in this area. With a little bit of research, you should be able to find a great option that fits both your budget and your needs.
Credit: exiletech.com
What Do You Need to Make Screen Print Transfers?
If you want to make your own screen print transfers, there are a few things you’ll need: -Screen printing ink -Transfer paper
-A printer -A cutting tool (like a razor or exacto knife) -A piece of cardboard or something similar to use as a backing for your transfer
First, you’ll need to print your design onto the transfer paper using your printer. Make sure to mirror your image before printing so that it will come out correctly on the final product. Then, use your cutting tool to cut out the design on the transfer paper.
Next, lay your piece of cardboard or other backing material on top of the shirt or surface you’re wanting to transfer your design onto. Place the transfer face down on top of this, then use something flat and firm (like a credit card) to rub over the back of the transfer paper until you’ve gone over the entire design. You should start to see the ink transferred onto the shirt at this point.
Finally, carefully peel away the transfer paper to reveal your newly screen printed design!
How Do I Create a Digital Image for Screen Printing?
Assuming you would like a tutorial on how to create a digital image for screen printing: Creating a digital image for screen printing involves using graphic design software to create or edit an image, and then saving the file in either a vector or raster format. Vector files are preferred for screen printing, as they can be scaled up or down without losing resolution, but raster files can also be used.
To create a vector file, start by opening your graphic design software and creating or importing the image you want to use. If you’re starting from scratch, use the pen tool to draw your design or trace an existing image. Once your design is complete, select all of the elements and convert them to vector paths.
Finally, save the file as an .eps or .ai file.
If you’re working with a raster file, open the image in your graphic design software and resize it to fit your desired print area. Then, use the Trace Bitmap function to convert it to a vector path. Save the file as an .
eps or .ai file.
How Do I Make a Digital Ink Transfer?
Inkjet printers are the best type of printer to use for a digital ink transfer. Make sure to print your design on regular copy paper, not photo paper or cardstock. Cut out your design, then use a piece of clear packing tape to adhere the paper face-down onto your wood surface.
Use a brayer or old credit card to smooth out any air bubbles. Let the packing tape dry for at least an hour (overnight is better). Once it’s dry, slowly peel back the paper to reveal your transferred design!
If any ink comes off with the paper, simply lay the paper back down and press firmly with your brayer or credit card until the ink adheres fully to the wood.
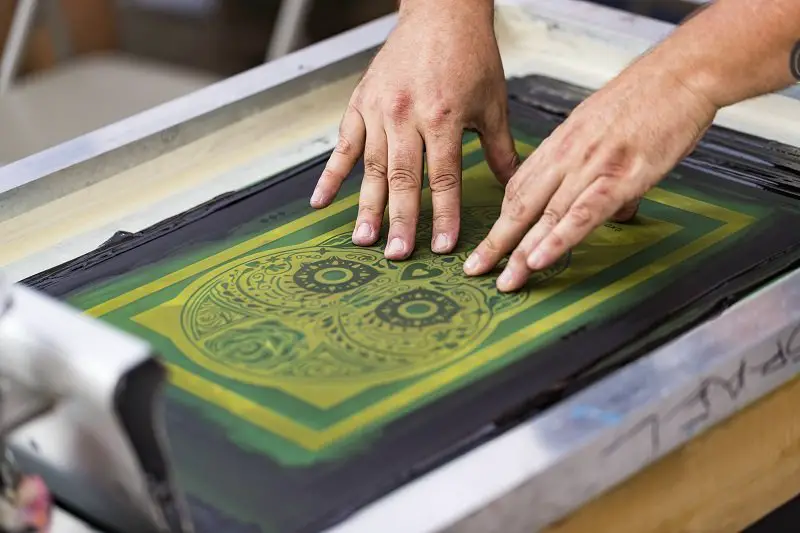
How Do You Make a Screen Print at Home?
To make a screen print at home, you’ll need a piece of screening material, some fabric paint, and a frame to stretch the screening over. First, lay your piece of screening over the fabric you want to print on. Then, using a brush or sponge, apply the paint to the top side of the screen.
Make sure to use even strokes so that the design will be printed evenly on the fabric. Finally, place the frame over the top of the screen and press it down firmly. This will help to ensure that your design comes out clear and sharp.
Beginners Guide to Screen Print Transfers from Transfer Express
Conclusion
Making digital screen transfers at home is easy with the right tools. You’ll need a digital image file, transparency film, and a screen printing frame. First, print your image onto the transparency film.
Then, stretch the screen printing frame over the top of the transparency. Secure the frame in place with tape or clamps. Next, use a squeegee to apply ink to the top of the screen.
Be sure to apply pressure evenly across the surface of the screen. Finally, place your substrate (the material you’re printing onto) under the screen and press down firmly. The ink will transfer onto your substrate in a reverse image of your original design.