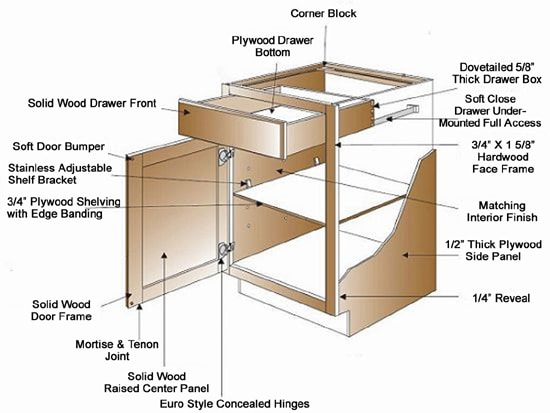
Framed Shower Door Installation Process
The installation process for a framed shower door can vary depending on the type of door you have chosen. Generally speaking, however, the process involves assembling and attaching the frame to the wall or tub surround and then attaching any necessary hardware such as hinges, handles, locksets etc. Once this is completed, it’s time to place your glass panels into their tracks in the frame before securing them with clips or screws.
Finally you need to adjust height and tension if needed before completing a final inspection of all components. It’s important that each step is done correctly in order for your shower door to look great and last for many years!
Installing a framed shower door is an easy and straightforward process. It typically involves measuring the opening of your shower, cutting or filing down any excess material, attaching the frame to the wall with bolts and screws, installing the glass panels into the frame, then adding handles and knobs for convenience. With just a few simple tools you can have your new framed shower door up in no time!

Credit: www.fabglassandmirror.com
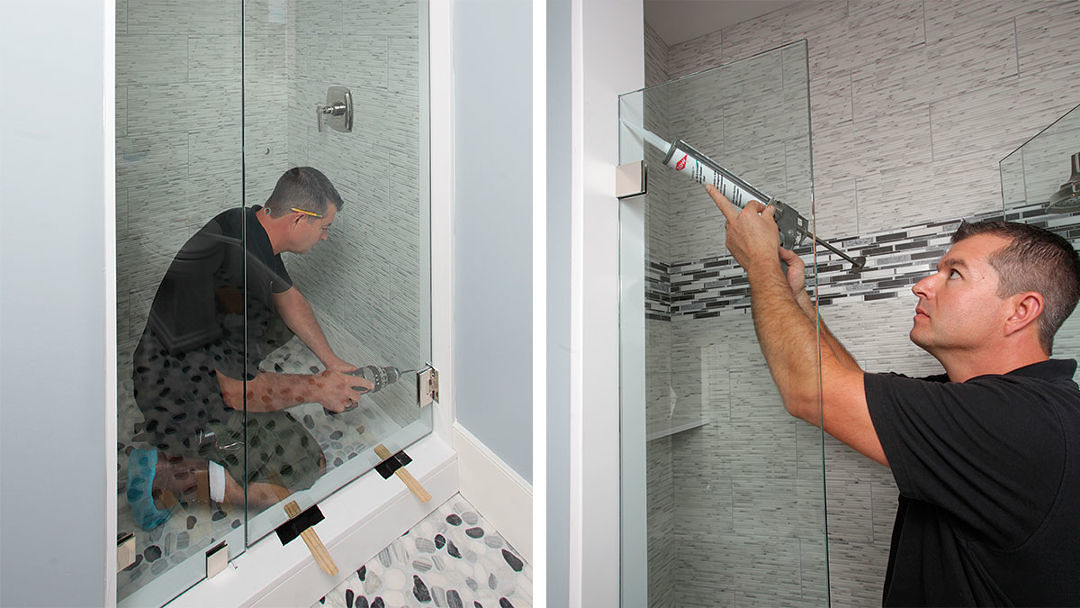
How to Install a Hinged Glass Shower Door
Installing a hinged glass shower door is an easy and straightforward process that can be done in no time. Start by gathering the necessary tools and materials such as hinges, screws, drill bits, a leveler, silicone sealant, and a wrench. Next measure the opening of your shower to determine the size of the door you need.
Once you have all of your supplies ready to go hang your new door onto the hinges securing them into place with screws at each point. Finally apply silicone sealant around the edges for added waterproofing before closing up shop!
Credit: www.finehomebuilding.com
How to Install a Framed Glass Shower Door?
Installing a framed glass shower door is an easy job but requires some basic tools and materials. First, you will need to measure the opening of your shower and make sure that the frame fits within it before purchasing. Once you have purchased your frame, use a level to ensure it is even on all four sides when hanging from the ceiling or wall studs.
Next, attach the appropriate mounting hardware for the type of door frame you are using; typically this includes screws, anchors or toggle bolts depending on what type of surface you are attaching it to. After securing the frame in place with these fasteners, install any weather stripping around its edges as well as rubber gaskets where needed to help create a watertight seal between your new glass panels and their frames. Finally, insert your chosen panes into their respective locations and secure them with silicone caulk if desired.
With these steps complete, your newly installed framed glass shower door should be ready for use!
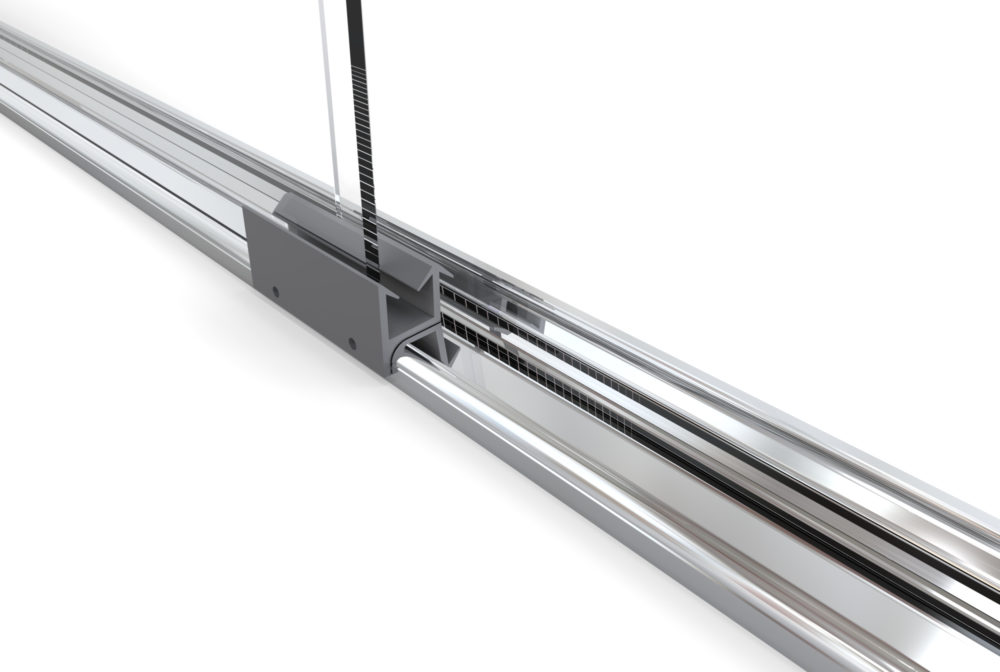
How Do You Install a Framed Sliding Shower Door?
Installing a framed sliding shower door is relatively simple and straightforward. First, you will need to measure the width of your opening for the door and purchase a sliding door with tracks that are slightly wider than this measurement. Next, install the track along the top first by screwing it into place at both ends.
You may also need to use wall anchors if your walls are not solid enough to support screws alone. Once this is in place, hang each side of the glass onto its respective roller wheel on the track before finally attaching them together with clips or clamps provided with most shower doors. Lastly, check all of your measurements and make sure everything is secure before enjoying your new shower enclosure!
Credit: bascoshowerdoor.com
How Long Does It Take to Install a Framed Shower Door?
The amount of time it takes to install a framed shower door will depend on the complexity of the job. Generally, it can take anywhere from two to four hours for an experienced installer to complete the task. This may include measuring and cutting metal framing, installing clips and hinges, attaching glass panels, adjusting seals and handles, and more.
Furthermore, additional factors such as the size of your shower space or any existing hardware in place could increase installation times. To ensure that everything is properly installed and functioning correctly, it’s always best to leave this job in qualified professionals’ hands!
How are Shower Doors Installed?
Installing a shower door is not a difficult job, but it does require some time and effort. The first step in the installation process is to measure your existing shower opening and purchase the right size of door for it. Once you have the new door, you will need to attach bottom tracks or hinges to your walls that will hold up the weight of the glass panel.
Next, position the panels into place with shims as necessary and secure them using screws or bolts. Finally, add any hardware such as handles or locks and then make sure everything fits properly before securing each piece in place with silicone caulk.
DIY Framed Shower Door Installation – Basco Deluxe 6150 & 7150 How To
Conclusion
In conclusion, the installation of a framed shower door is relatively simple when following our outlined steps. You should always refer to the manufacturer’s instructions for specific installation details and safety requirements. Take your time and be sure to measure twice before cutting any glass panels or frames so that you can have a successful DIY project with minimal effort.