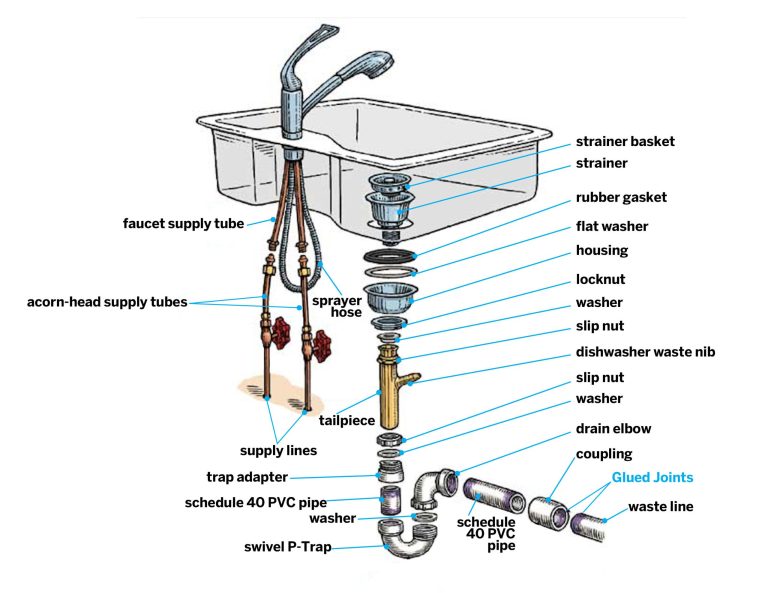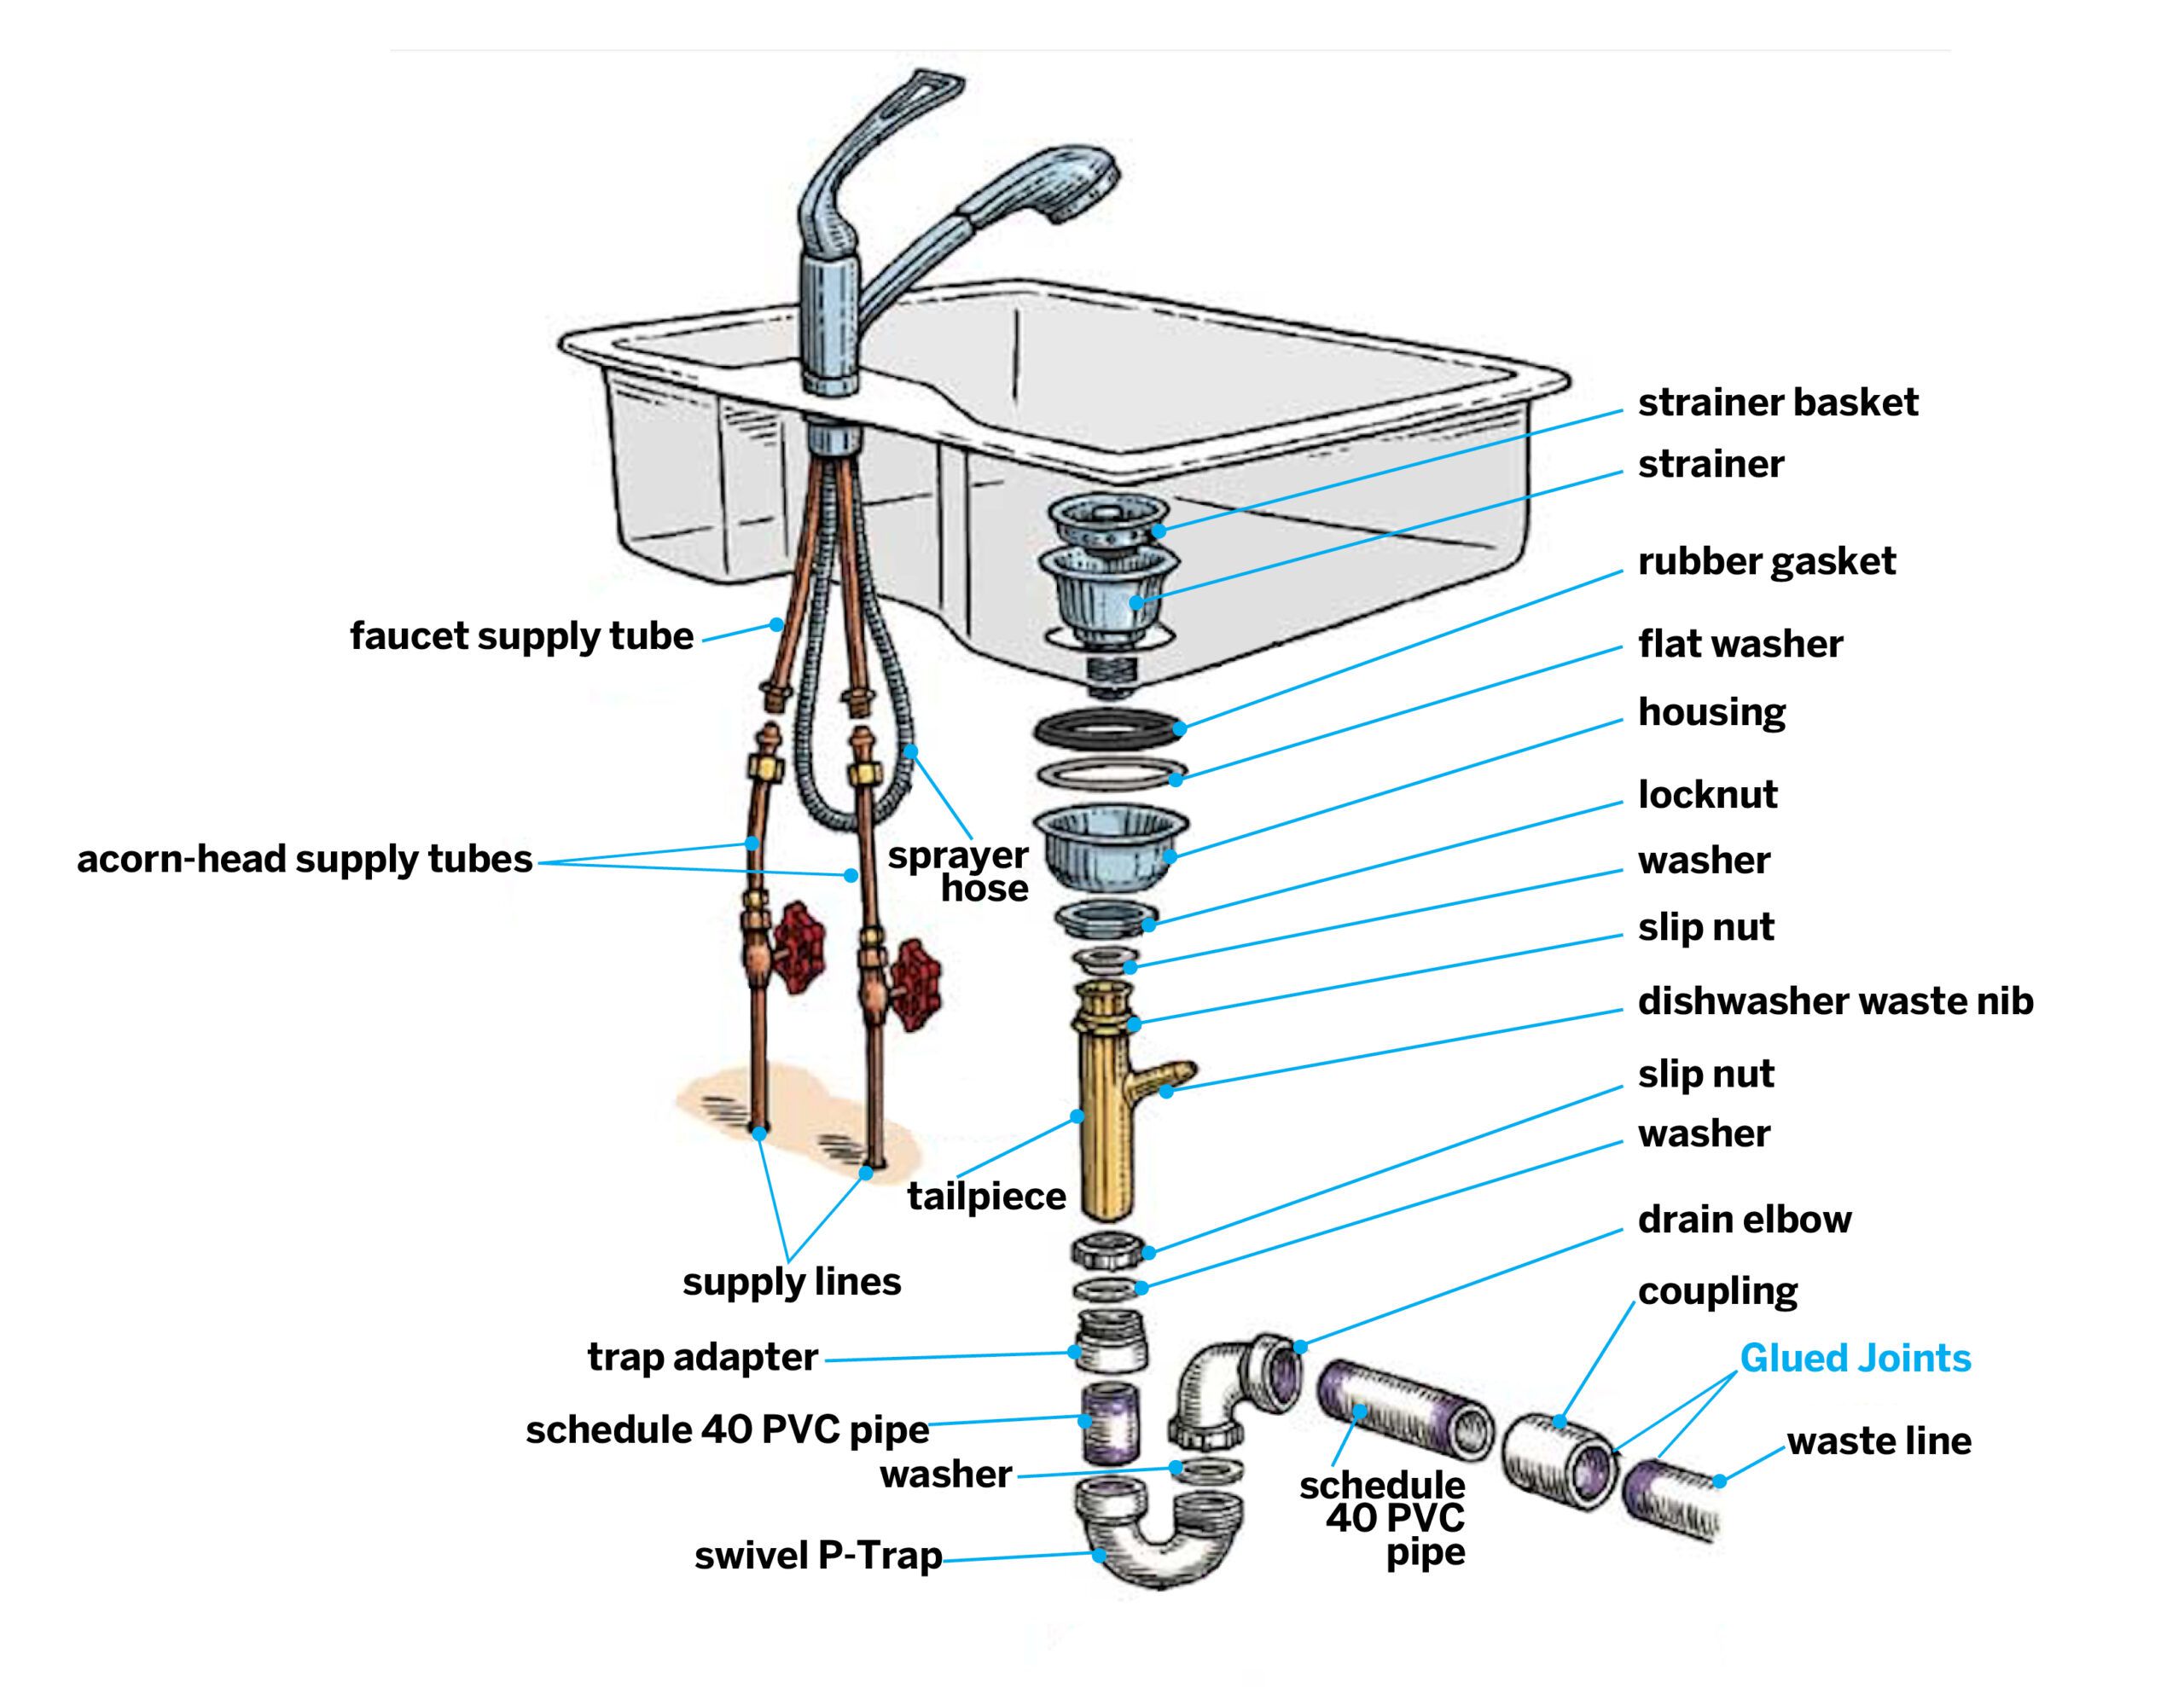
How Do You Attach The Drain To A Kitchen Sink?
Attaching the drain to a kitchen sink can be a simple task with the right tools and materials. It is important to ensure that the drain is properly sealed and connected so that no leaks occur. You will need a drain flange, a basket strainer, plumbers putty, and a few tools. First, remove the old drain and basket strainer, then clean the sink area. Next, apply the plumbers putty to the underside of the flange, then connect it to the sink. Secure the flange with the provided screws. Finally, attach the basket strainer and tighten with a wrench. Once the drain is secure, your kitchen sink will be ready for use.
Types of Drain Connections
Drain connections are an integral part of any plumbing system. There are a variety of types of drain connections available, each with their own advantages and disadvantages. The most common types of drain connections are compression, slip joint, and solvent weld. Compression connections involve tightening a nut over a gasket to form a leak-proof seal, while slip joint connections use a rubber washer and a metal nut to form a seal. Solvent weld connections involve using a chemical adhesive to bond two pieces of pipe together. Knowing the type of drain connection is essential for any plumbing project, as the wrong type of connection can lead to a leaky system.
Preparing the Pipe Fittings
Preparing the Pipe Fittings is a critical step in any plumbing project. It involves a series of steps that must be followed to ensure that the fittings are correctly secured and ready to use. This includes cutting the fittings to the correct length, deburring the edges, and applying the appropriate sealant. It also requires the use of specialized tools, such as pipe cutters and reamers, in order to ensure a precise fit. Taking the time to properly prepare the pipe fittings can help to prevent unnecessary complications and costly repairs down the line.
Attaching the Drain Tailpiece
Attaching the drain tailpiece is an important step in the installation of a sink or tub. This tailpiece is a short pipe that connects the drain line to the sink or tub. It is typically made of PVC or ABS plastic and is relatively easy to install. The first step is to measure and cut the tailpiece to the appropriate length. Next, it is important to make sure the connection is secure by using pipe sealant and PVC-rated thread seal tape. Finally, the tailpiece should be securely attached to the sink or tub drain line with the appropriate mounting hardware. With the proper tools and a few simple steps, attaching a drain tailpiece can be a straightforward task.
Connecting the P-Trap
“The P-Trap is an integral part of a plumbing system and can be found in most residential and commercial buildings. It is designed to prevent sewer gases from entering the building while also trapping debris and preventing clogs in the sewer line. Connecting the P-Trap is a relatively simple process, but it is important to understand the steps involved to ensure a successful installation. By following a few basic steps, you can easily connect your P-Trap and ensure that your plumbing system is safe, secure and functioning optimally. With the right tools and a little know-how, connecting the P-Trap is an easy task for any DIYer!”

Securing the Drain Flange
“Securing the Drain Flange” is an essential step in the plumbing process. It ensures that your drain is protected from leaks and other potential problems. The flange is the metal piece that fits around the outside of your drain pipe and seals it against the wall. To secure the flange, you’ll need to use screws and a washer. Begin by applying some thread sealant to the flange and the drain pipe, then fit the flange over the pipe. Secure it in place with the washer and screws, tightening them to the manufacturer’s specifications. And there you have it: your drain flange is now securely in place and you can rest easy knowing that your pipes are ready to handle whatever comes their way.
Connecting the Drain Stopper
Connecting the Drain Stopper is an invaluable resource for homeowners looking to repair their drain and keep their pipes clean. We provide step-by-step instructions for replacing, repairing, or replacing a drain stopper. Our blog also provides useful information on different types of stoppers, how to maintain them, and common problems that arise with stoppers. Our content is written by experienced professionals who understand the importance of proper plumbing maintenance. We pride ourselves on offering the best advice available to help homeowners save time and money. With our blog, you can quickly and easily learn how to repair or replace your drain stopper.
Completing the Drain Installation
The process of installing a drain is not as daunting as it may seem. By following a few simple steps, you can complete a successful drain installation. First, determine the size and type of drain needed. Next, figure out where the drain should be placed in relation to the plumbing fixtures and the existing drainage system. Once the location is established, the drain can be installed. This includes cutting the hole for the drain, connecting the pipes, and securing the drain with a proper sealing material. Finally, it is important to test the drain to make sure it is functioning properly before using it. By following these steps, you can complete a successful drain installation.
Troubleshooting Common Issues
The blog section “Troubleshooting Common Issues” offers tips and advice on how to quickly and effectively troubleshoot issues that may arise. It is designed to provide a comprehensive overview of common issues that can be encountered in day-to-day operations, as well as best practices for addressing them. The blog also offers detailed explanations of different troubleshooting strategies and tools that can be used to diagnose and fix problems. From identifying the root cause of a problem to understanding the proper steps to take to resolve it, this blog section provides the knowledge and resources needed to quickly identify and resolve common issues.
Conclusion
Attaching a drain to a kitchen sink is a fairly simple process, requiring only a few basic tools and supplies. After getting the necessary parts, you should first attach the drainpipe to the drain, then connect the drainpipe to the sink itself. Finally, you should use plumber’s putty to seal the area and ensure that no leaks occur. With a few simple steps, you can easily install the drain and complete your kitchen sink project.