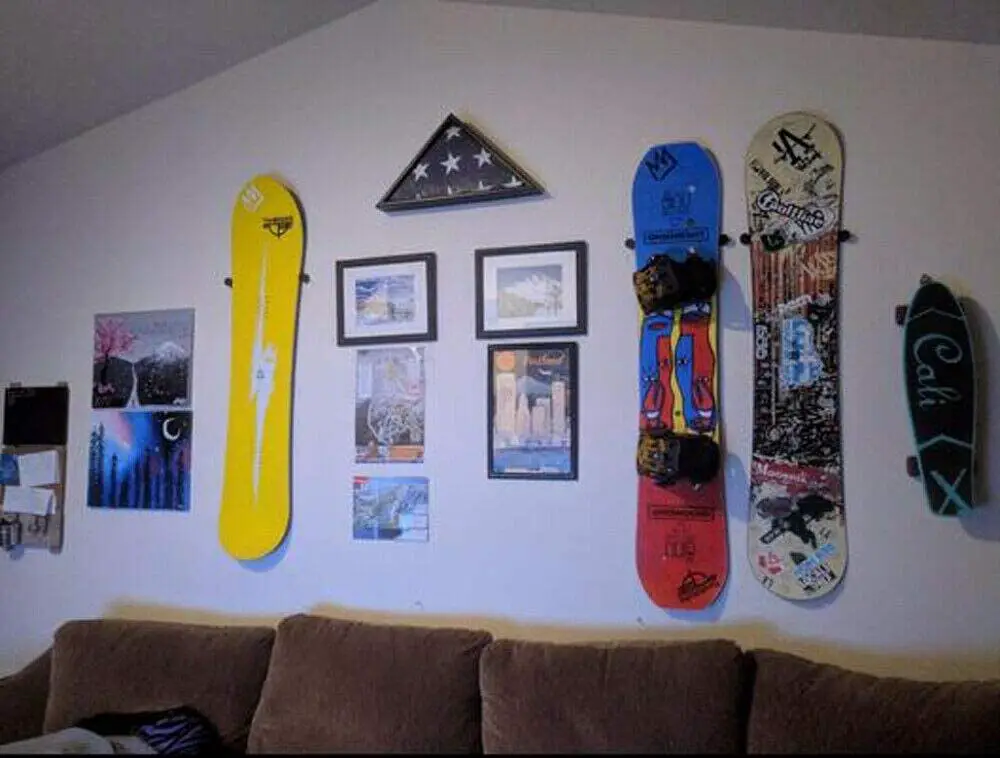
How to Hang a Snowboard on the Wall
Hanging a snowboard on the wall is a great way to show off your love of the sport, and it can also be a practical way to store your board. Here are some tips on how to hang a snowboard on the wall:
Choose a location for your snowboard. You’ll want to find a spot where the board will be safe from damage and where it won’t be in the way.
Measure the width of your snowboard and mark out two points on the wall that are equal distances apart. Use a level to make sure that your marks are level with each other.
Drill holes at your marks and insert anchors into the holes.
Hang your snowboard from the anchors using screws or hooks designed for hanging pictures or artwork.
- Find a stud in the wall using a stud finder
- Mark the location of the stud with a pencil
- Measure up from the floor to where you want the snowboard to hang and mark that spot with a pencil
- Drill a hole at the top mark, big enough for a screw to fit through
- Insert a screw into the hole and screw it into the stud until it is tight
- Hang your snowboard on the screw
How Do You Hang a Snowboard?
Assuming you would like tips on how to properly hang a snowboard: It is important to know how to properly hang a snowboard because it will help prolong the life of your board. When storing your board, always make sure to keep it away from heat sources and direct sunlight.
You also want to avoid hanging your board by the bindings, as this can put unnecessary stress on them and cause them to break down over time. The best way to hang a snowboard is by using a wall hanger specifically designed for storing snowboards. These hangers are usually made of tough plastic or metal and have padded arms that cradle the board to help prevent scratches and dings.
Simply find a stud in your wall and screw the hanger in place. Then, gently place your board on the hanger making sure that the bindings are not resting on anything. If you don’t have a specific snowboard hanger, you can also use large J-hooks or S-hooks designed for heavy-duty applications.
Just be sure that whatever type of hook you use is firmly attached to the wall so that it can support the weight of your board.
How Do You Make a Snowboard Holder?
Assuming you would like a step-by-step guide on how to make a snowboard holder: First, you will need some supplies. For this project, you will need two 1x4s (8 feet long), a drill, a dowel jig, 3/4 inch dowels (2), clamps, wood glue, a hammer, chisels, a coping saw, and sandpaper.
Next, you will cut the 1x4s into four pieces – two at 4 feet long and two at 2 feet long. Then, using the dowel jig and drill, create pocket holes at each end of the 4-foot boards and one hole at each end of the 2-foot boards. Now it is time to start assembling!
Take one of the 4-foot boards and line up the pocket holes with those on one of the 2-foot boards. Clamp them together and using wood glue and dowels, join them together. Repeat this step for the other set of 4-foot and 2-foot boards.
Once both sides are assembled, it is time to add cross supports for stability and extra space to store more than one snowboard. Cut your remaining dowels into lengths that will fit snugly between the two side assemblies – we recommend 18 inches. Insert these into pre-drilled holes or use clamps to hold them securely in place while you attach them with wood glue or screws.
Finally, finish up by sanding down any rough edges created during assembly then enjoy your new snowboard storage rack!
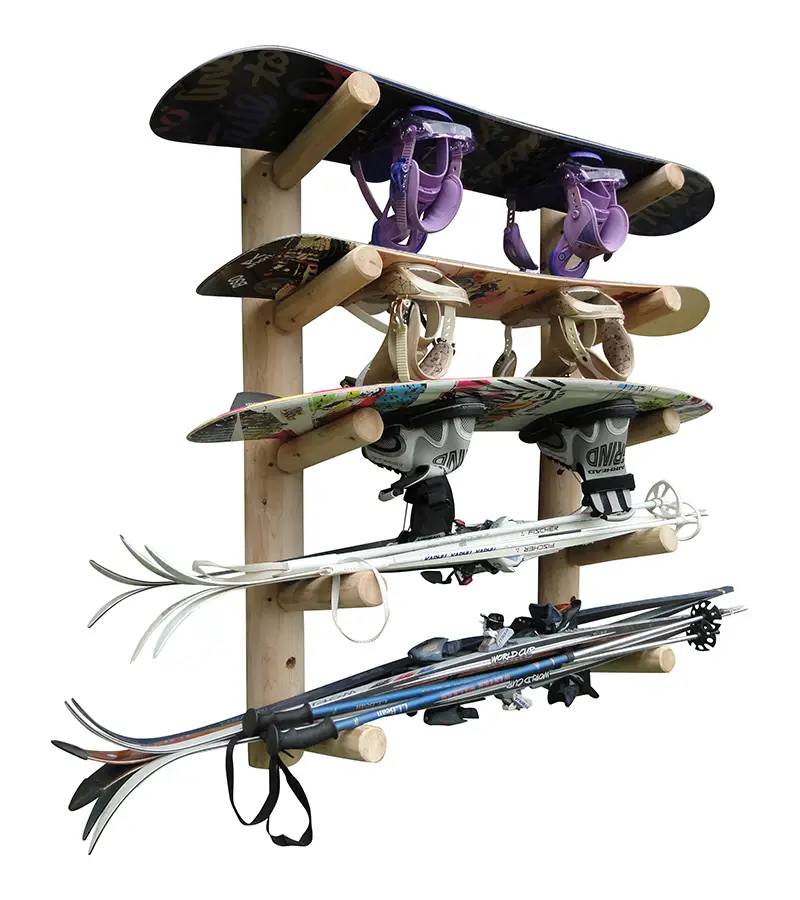
Credit: logskirack.com
How Do You Make a Homemade Snowboard?
A snowboard is essentially a plank of wood or composite material that you strap your feet to and slide down a hill. You can purchase a pre-made snowboard from any sporting goods store, but they can be expensive. If you’re handy with tools and have access to the necessary materials, you can save money by making your own snowboard at home.
The first step is to choose the right type of wood for your snowboard. The most common types are maple and ash, but other woods like birch or poplar can also be used. Once you have the wood, cut it into the desired shape and size using a jigsaw or hand saw. Snowboards are typically around 1” thick and measure anywhere from 10” to -16” wide.
Once you have the basic shape cut out, smooth the edges with sandpaper and then drill holes for the bindings. Bindings are what keep your feet attached to the board, so make sure they’re installed securely. You can buy bindings at most sporting goods stores or online retailers.
After the bindings are in place, it’s time to add the finishing touches. This includes adding graphics or stickers to the top of the board (if desired), as well as applying a layer of protective wax. You can find both of these items at most sports stores or online retailers specializing in snowboarding gear.
With some patience and attention to detail, anyone can build their own custom snowboard at home – and save themselves some money in the process!

Credit: www.youtube.com
How to Hang a Snowboard on the Wall Horizontally
If you’re like most snowboarders, you take pride in your gear and want to show it off when you’re not hitting the slopes. A great way to do that is to hang your snowboard on the wall horizontally. Here’s how:
First, find a stud in your wall using a stud finder. Then, mark the location of the stud with a pencil. Next, measure out from the stud where you want the center of your snowboard to be and mark that spot with a pencil as well.
Now it’s time to drill some pilot holes. Drill two holes at the marks you just made – one for each end of your snowboard’s bindings. Be sure to use a drill bit that’s slightly smaller than the screws you’ll be using so they can grip the wood nicely.
Once your pilot holes are drilled, screw in some sturdy hooks (like these) at each mark. Now all you have to do is hang up your board and enjoy!
How to Hang a Snowboard – HangTimeUSA Wall Mounts
Conclusion
If you’re a snowboarder, you probably want to show off your sick boards. But how do you hang a snowboard on the wall? It’s actually pretty simple.
All you need is a screw hook and some heavy-duty string or rope. First, find a stud in the wall using a stud finder. Then, screw the hook into the stud.
Be sure to use a large washer with a hook to distribute the weight of the board and prevent the screws from pulling out of the drywall. Next, tie one end of the string or rope to the hook, and thread it through the bindings of your snowboard. Finally, tie the other end of the string or rope to another screw hook (or anything else that will support the weight of your board).
And that’s it! You’ve now successfully hung your snowboard on the wall.