How to Poche Walls in Revit
If you’re working on a Revit project that requires poche walls, there are a few things you need to know. First of all, poche walls are usually only found in commercial or institutional buildings – so if you’re working on a residential project, you can probably skip this step. Poche walls are basically just solid walls with a recessed area – sort of like a built-in shelf.
They’re commonly used to create storage space in rooms like kitchens and bathrooms. Poche walls are created using the Wall tool in Revit. To start, draw a rectangle where you want the wall to be located.
Then, click the Modify tool and select the Offset command. Enter the desired offset distance – this will determine how deep the recess is. Finally, click the checkmark to complete the command and your poche wall is ready!
- In the Revit interface, select the “Wall” tool from the left-hand menu
- With the wall tool selected, click and drag to draw a line where you want your wall to be
- To add a poche to your wall, select the “Poche” tool from the right-hand menu
- With the poche tool selected, click on one of the corners of your wall
- A poche will appear on that corner of your wall
- Repeat this process for each corner that you want to add a poche to
How Do You Add a Poche in Revit?
In Revit, a poche is an element that you can use to cut openings in walls, floors, and ceilings. To add a poche:
- Select the wall, floor, or ceiling where you want to add the poche.
- In the Properties palette, click Add > Poche.
- In the Type selector, choose the type of poche that you want to add.
- Specify the size and location of the poche opening.
- Click OK to close the dialog box and create the poche opening.
How Do I Black Out a Wall in Revit?
If you’re looking to add a little bit of darkness to your Revit model, you might be wondering how to black out a wall. Luckily, it’s a pretty simple process! Here’s how to do it:
- Select the wall that you want to black out.
- In the properties panel, under the “Appearance” tab, change the “Color” setting to “Black”.
- That’s it!
The wall will now be black in your Revit model.
How Do You Edit Walls in Revit?
In Revit, you can edit walls in a number of ways. You can change their height, width, thickness, and material. You can also add or remove openings in walls, and adjust the location of doors and windows.
To edit a wall in Revit, first select it in the project browser. Then click the Modify tab on the ribbon, and click the Edit button. This will open the Wall Specification dialog box.
From here, you can make changes to the wall’s properties. To change the height of a wall, select it in the Type selector at the top of the dialog box. then enter a new value in the Height field under Dimensions.
To change the width of a wall, enter a new value in the Width field under Dimensions. To change the thickness of a wall, enter a new value in Thickness under Structure. To add an opening to a wall, click Add Opening in the Openings section of the dialog box.
How Do You Cut a Line in Poche in Revit?
In Revit, there are two ways to cut a line: the first is to use the “Cut Geometry” tool, and the second is to use the “Divide Element” tool. The “Cut Geometry” tool is located in the Modify tab, under the Cut drop-down menu. To use this tool, select the line you want to cut, then click on the “Cut Geometry” button.
In the dialogue box that appears, select the point at which you want to cut the line, then click OK. The “Divide Element” tool is located in the same place – in the Modify tab, under the Cut drop-down menu. However, instead of selecting a point to cut at, you specify how many segments you want the line divided into.
So, for example, if you wanted to divide a line into four equal segments, you would enter 4 in the dialogue box that appears when you click on “Divide Element”.
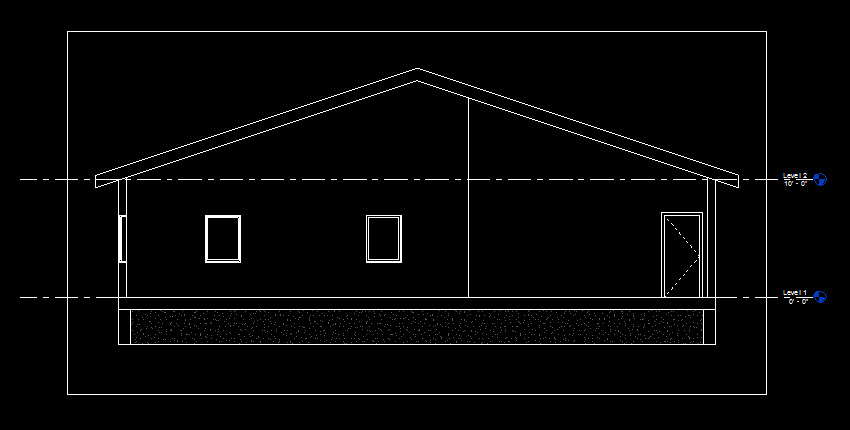
Revit Tutorial – Poche of Walls, Cleaning up Graphics
Revit Existing Walls Solid Fill
If you’re working on a Revit model that includes an existing wall, you may want to use the “solid fill” feature to fill in the wall. This can be a quick and easy way to add some visual interest to the model, and it can also help with construction coordination. Here’s a quick overview of how to use the solid fill feature:
- Select the wall that you want to fill.
- Go to the “Modify” tab and click “Edit Profile.”
- Click on the “Fill” button.
- Select the type of fill that you want to use from the drop-down menu. You can choose from solid, gradient, or pattern fills.
- Adjust the settings for the fill, such as color, transparency, etc. as desired.
- Click “OK” when you’re done making changes.
Conclusion
If you’re wondering how to poche walls in Revit, then this blog post is for you. Poaching is a process of creating cutouts or recesses in walls, and it’s a handy tool to know if you’re working in Revit. Here’s a step-by-step guide on how to poche walls in Revit:
- Select the wall that you want to poche.
- Go to the Modify tab and click on the Poche button.
- In the Type Properties dialog box, select the type of cutout that you want to create (e.g. rectangular, circular, etc.).
- Specify the dimensions of the cutout. 5. Click OK to create the cutout.