How Do You Fit A Kitchen Sink Strainer?
Installing a kitchen sink strainer is an important part of any kitchen remodel or upgrade. The strainer is a crucial part of your plumbing system and helps to keep food particles and other debris from clogging the drain pipes. Installing a kitchen sink strainer correctly is important to ensure that it functions properly. This guide outlines the steps to properly fit a kitchen sink strainer.
Types of Kitchen Sink Strainers
Kitchen sink strainers are an essential component of any kitchen sink, as they help to prevent clogs and obstructions in the drain pipe. There are different types of kitchen sink strainers available on the market today, each with its own advantages. Push-fit strainers are the most basic type of strainer and come in a variety of sizes and shapes to fit any sink. These are easy to install and simple to use, making them ideal for those who want a quick and easy solution. Basket strainers are another popular option and are designed to trap food particles and debris, allowing water to pass through while preventing clogs. Finally, there are specialty strainers that can be used for additional tasks, such as filtering out large debris, preventing grease buildup, or preventing odors from entering the drain. No matter what type of kitchen sink strainer you choose, it is important to regularly clean and maintain it for peak performance.
Preparation for Installing a Kitchen Sink Strainer
Preparing to install a kitchen sink strainer may seem like a daunting task, but with the right instructions and tools, you can easily get the job done. To ensure a successful installation, make sure to first measure the size of your sink and the strainer. Next, you’ll need to gather the necessary supplies to do the job, including a wrench, plumber’s putty, a putty knife, a strainer basket, and a screwdriver. Once you have everything, you can begin the installation process. First, remove the old strainer, then be sure to clean the sink area, and apply the plumber’s putty to the new strainer. Finally, secure the strainer in place with the screwdriver, and you’re all set! With these simple steps, you can quickly and easily install a kitchen sink strainer.

Tools and Materials Needed
Tools and Materials Needed is a helpful blog post that outlines all the necessary items needed for a successful project. Whether you are an experienced DIYer or a beginner, this blog post will give you the information you need to get the job done right. We cover everything from basic tools, such as hammers and saws, to more specialized items, like glue guns and paintbrushes. We also discuss the materials needed, such as wood, screws, nails, and other items. With our blog post, you’ll have everything you need to complete your project with confidence. So, read up and get ready to tackle your next project with the right gear!
Steps for Installing a Kitchen Sink Strainer
Installing a kitchen sink strainer is a great way to keep your sink free from clogged debris. Here are the steps to take in order to successfully install a kitchen sink strainer:
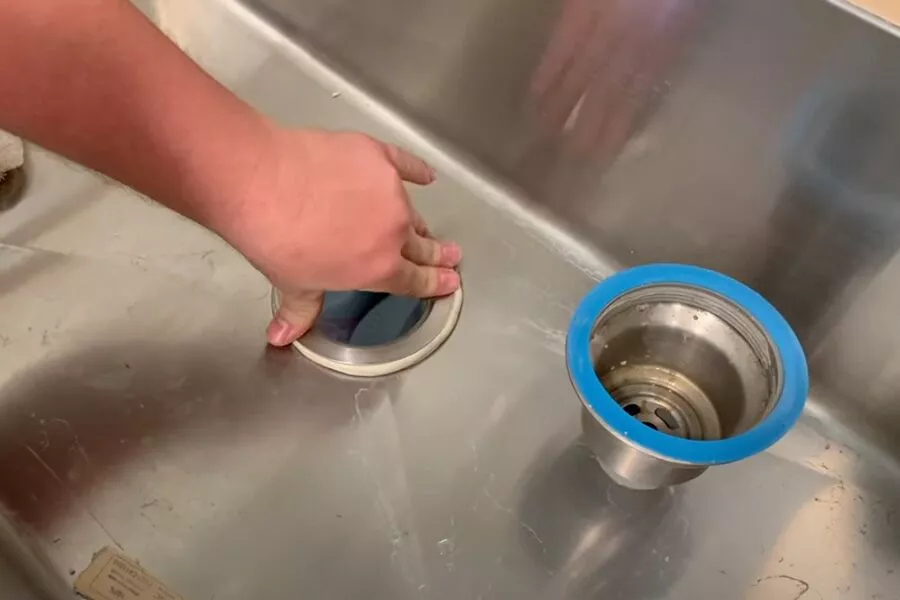
- Start by measuring the sink’s drain hole and purchasing a strainer that fits the dimensions.
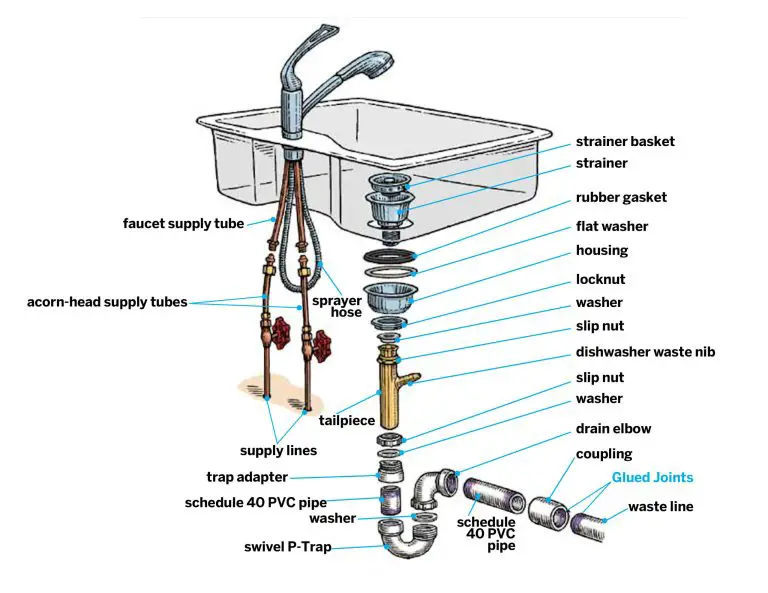
- Place the strainer into the sink drain hole and secure it with the provided nuts and washers.
- Make sure to securely tighten the nuts and washers and check for any potential leaks.
- Install the tailpiece and attach the basket to the tailpiece.
- Connect the drain lines to the strainer and secure them with nuts and washers.
With these simple steps, you can have your kitchen sink strainer installed in no time! It’s a great way to protect your sink when washing dishes or doing other tasks. So, don’t wait to install a sink strainer and start enjoying the benefits today!

Tips for Sealing the Sink Strainer
Sealing your sink strainer can help prevent water leakage and save you time and money. To properly seal the sink strainer, start by removing the strainer from the sink and cleaning it thoroughly. Then, apply a high-quality silicone sealant to the underside of the strainer and place it back in the sink. Make sure to press down evenly on the strainer so that the sealant is evenly distributed and allow it to dry for 24 hours before using the sink again. Following these simple steps can help ensure that your sink strainer remains secure and watertight.
Cleaning and Maintaining the Kitchen Sink Strainer
Maintaining a clean kitchen sink strainer is essential for keeping your kitchen sink free from clogs and other debris. With regular cleaning, you can ensure that your sink strainer is free of any build-up, allowing for better drainage and preventing unsanitary build-up in your kitchen. To clean a kitchen sink strainer, start by removing it from the sink and using a soft-bristled brush to scrub away any food particles, dirt, or other debris. Rinse the strainer off with hot water, and use a small amount of dish soap if necessary. Dry off the strainer with a cloth and then replace it in the sink. For best results, repeat this process at least once a month to ensure your sink strainer stays clean and free from clogs!
Troubleshooting Common Kitchen Sink Strainer Issues
The kitchen sink strainer is one of the most important parts of the kitchen, yet it can also be one of the most troublesome. From clogs and slow drainage to foul odors and leaks, troubleshooting common kitchen sink strainer issues can be a daunting task. However, with a few simple steps, you can quickly identify and resolve the source of your kitchen sink strainer woes. From inspecting the strainer for clogs and debris to checking the seals for damage, our guide to troubleshooting kitchen sink strainer issues can help you diagnose and fix the problem quickly and easily. With our advice, you’ll have your kitchen sink strainer running smoothly in no time.
Conclusion
Installing a kitchen sink strainer is a fairly straightforward process. All you need to do is measure the sink opening, buy the appropriate-sized strainer, and then attach it to the sink. Once you have done this, you should check to make sure the strainer is properly sealed. With these simple steps, you can easily fit a kitchen sink strainer and enjoy a more efficient and hygienic kitchen sink.